Hey, y'all! A handful of my second graders got really close to being finished with their Folk Art Still Life which was my sub plan while I was out last week. I am so thrilled with their hard work (as are they) that I just had to share. Many of them are still adding flowers and leaves so I'm only sharing a handful. Their next step is adding small details with puffy paint which you know I love as much as they do. Here is the lesson video that my sub used with all of my students, kindergarten thru fourth grade:
Speaking of sub, if you need any tips, tricks and/or sub plans, I just hosted a Facebook LIVE chat last night on that very topic! The chat and all of the commentary is archived on my official Facebook page if you are interested. We have been doing those live chats for the last couple of months and they are blast. Well over 100 art teachers join in each time and it's a great way to share. So if you aren't busy on Wednesday night at 8pm CST, be sure and pop by!
While they were with the sub, some of my students had one 30 minute art class while others had two. So what the sub was able to accomplish was beyond her control. What I love about having a recorded lesson (and a project that the kids are in progress) is that when I return, I don't have to scramble to slap together lesson plans. I can just pick up where the sub left off.
With the sub, my students were able to get their sticks done and glued down to the background. When I came back this week, my students worked on their vases and flowers. By next week, they should have all of their flowers and leaves complete and be ready to add some puffy paint.
One thing that was not in the video was the oil pastel background. One of the kids added color to the background with the bright oil pastels and we all lost our minds...brilliant! So we all had to do the same. You know how that goes, right?!
I know they aren't complete...but I just had to share! I think these are so pretty and perfect for spring and Mother's Day. If you give this project a go, you'll have to let me know.
Tonight, on Facebook LIVE at 8pm CST, I thought we could talk about how to prepare for a sub. I'll share with you what I do to insure that I'll won't come back to a Hot Mess Express. I'd love to hear your tips. ALSO...I have BIG NEWS about our LIVE chats that I think you are going to love love love! So I'll see you real soon.
My lovely and sweet (ahem) spring-break-ready third graders are starting their string art project this week. We have prepared the boards by painting them (we are using cardboard pizza rounds purchased in bulk via Amazon) and adding texture. We also punctured holes in them to prep them stitching. Next week, we'll sketch out our designs and start stitching. Here's the video I created to introduce the kids to this process. Feel free to use and share in your art teacherin' world.
Even if you don't do this project with the kids, you might wanna watch it for the needle threading trick alone. Or you can just follow me here and catch a short clip.
There are many methods of string art but I'll be introducing my kids to ones that I call Spectrum and Radiating Design. I found the above, the one I call Radiating Design, to be a little more taxing simply because you have to get more yarn to make the lines go all the way around the board.
This one I'm calling Spectrum. This one is fun because you can use a lot of different colors. It's up to the artist just how much stitching happens within the design.
My third graders were at the end of this project when I introduced this new one. So during the second half of one art class, when they were finished with their candy sculptures, I had them quickly color, paint and scrape a texture onto their boards.
Today, the first half of class, we did this. I had a handful of kids that were absent the day so they worked on coloring and painting while the majority did this. Thankfully, we had this project to also work on. Have I ever told y'all that I have a habit of having the kids work in exactly 37 projects at once? I ain't proud.
The kids are stoked! I can't wait to share with you what they create.
Next week, I'll be heading to the Big Apple for the NAEA convention (you can check out the dates/times/topics I'll be presenting and co-presenting here). In preparation, I've been working on my sub plans which, as you know, is always a really good time. Because I'll be presenting on folk art, I decided to base my sub plans around that theme. In particular, my students will be learning about the Mexican folk artist Kerri Ambrosino.
I'm a sucker for color and pattern. I am using her work to also reteach the elements of art and introduce the principals of art. While I am gone, my students will tackle the first half of the sub plan video and we'll do the rest together when I return. Cuz there ain't no way those kids are using puffy paint without me! I'll be doing this lesson with all grades. When I create sub plan videos, I often do this because it is so much easier for the sub. They become experts at the lesson and don't feel flustered going from one lesson to the next, switching out visuals and supplies. A Happy Sub means Fewer Flubs! Here's the sub video. Feel free to use in your art teacherin' adventures:
Supplies needed:
* Popsicle sticks. I have ONE TRIZILLION popsicle sticks. I always get them donated and I never know what to do with them...until now. Of course, they aren't necessary for this project but they do add a fun three-dimensional element.
* Matte board/cardboard. This will hold the weight of the sticks. I have a surplus of card and matte board as well so this was a good way to use that up. I cut it 4" X 7".
* Construction paper. In various colors, also cut to 4" X 7" to serve as the background.
* Scrap papers. For the vase and flowers.
* Foam flowers. Again, another art room surplus. Let's use 'em up! They'll also add that fun third dimention.
* Puffy Paint!
While I'm away, I hope that the students will get all of their sticks decorated and glued to their background. For my 30 minute classes, they might only get the sticks complete. For my hour long classes, they should have no problem knocking that out. We are also creating large scale flower still lives for teacher appreciation...so my early finishers start on that with their decorated strip for the table.
Kerri's work is just wonderful! I love everything about it and I think my students will as well. I'm excited about these small masterpieces. They'll make a great addition to our art show and the perfect presents for Mother's Day...which I know is far off but I always procrastinate. Not this time!
I will be certain to share a follow-up blog post.
If you give this lesson a go, I'd love to know! Special thanks to my P.E. buddy Ali for working out the kinks of this project with me.
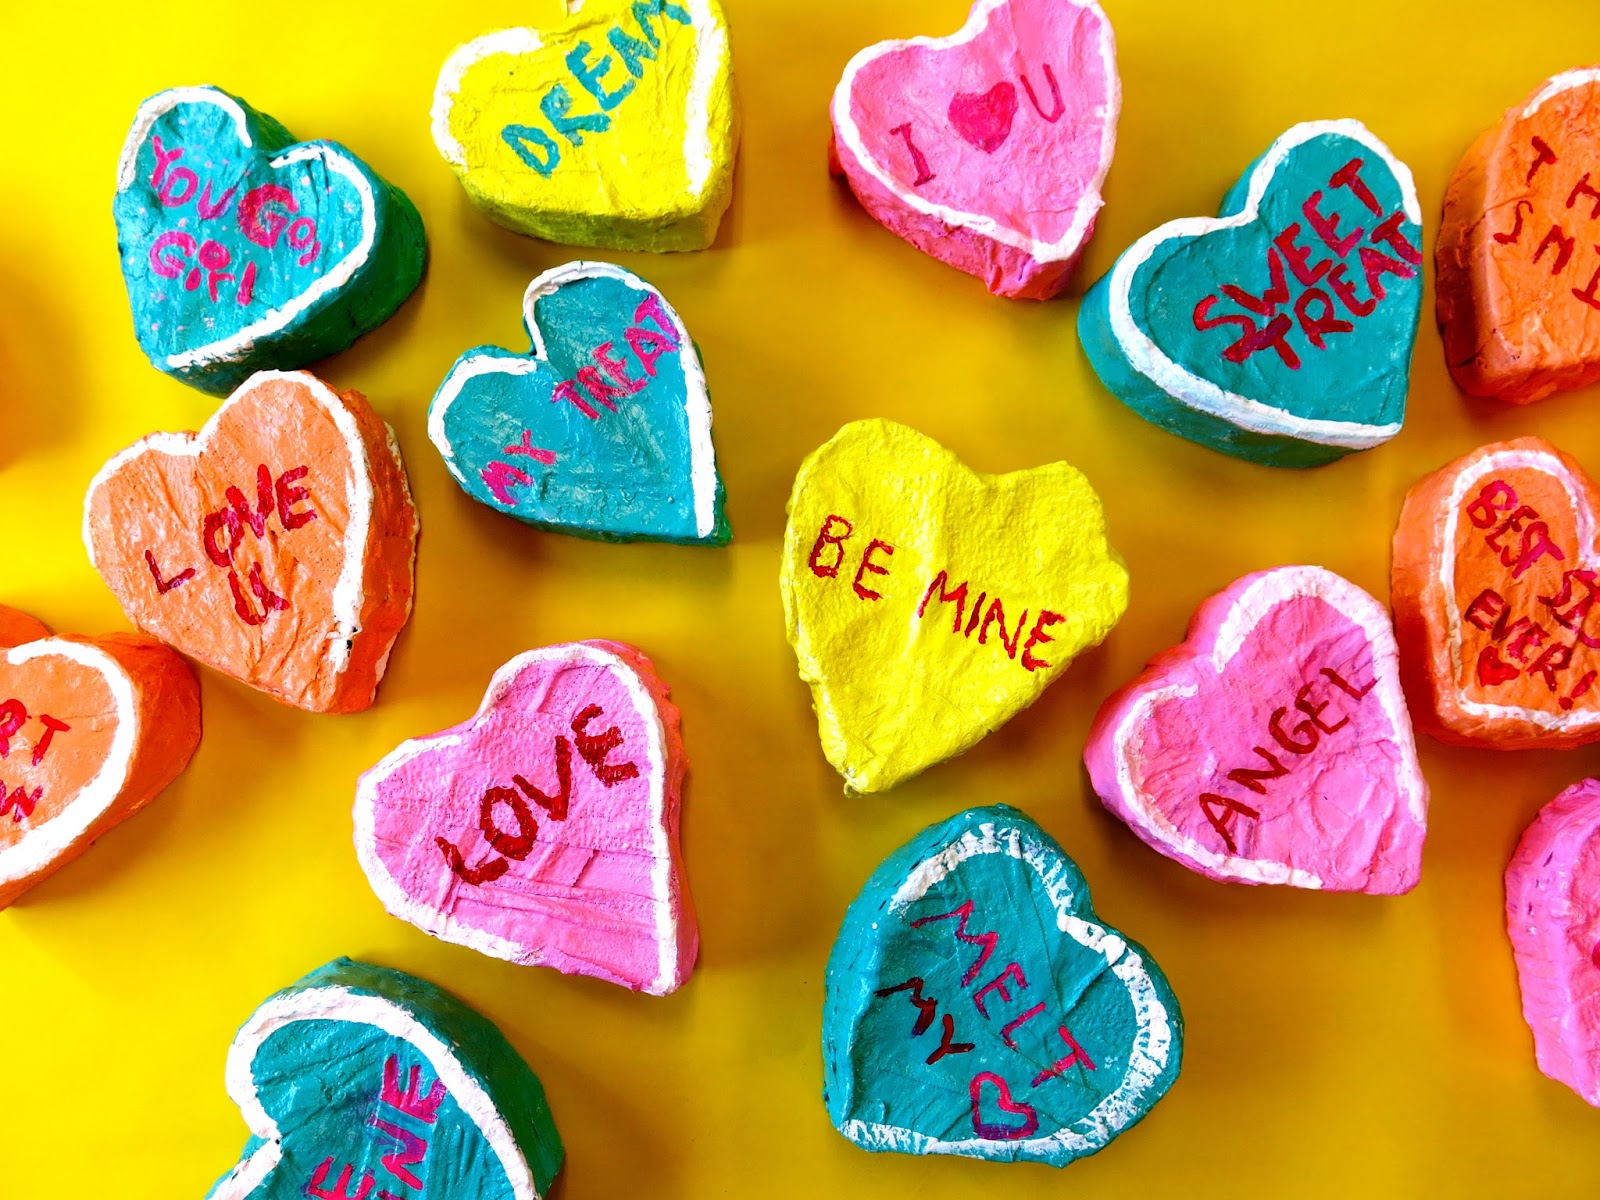
My fourth graders are wrapping up their Candy Heart Sculptures and I thought I'd share how they turned out. The kids loved creating these and were thrilled with their work. I'm not much of a project-repeater but this one might have to be done again! Here's the process video I created to share with my students and you:
I know several of y'all did this project with your students and mentioned that paint was flaking off. I only saw a little bit of that...so I'm thinking it might be the paint used. It's a constant search to find paint that is both nontoxic and good quality paint without being super expensive. We used a combination of Blick tempra, Sax Versa Temp and Chroma paint. I did seal the hearts with a quick couple swipes of ModPodge to prevent chipping and add a little shine.
I knew the struggle would be with the lettering...which is why in the video, I cover it so thoroughly. I'm happy I did, I think they did a great job painting their words on that lumpy bumpy plaster.
Knowing that I'd have some early finishers, I grabbed four large boxes out of the recycling bin and put those kids on candy box painting duty. I had primed the boxes with white paint the night before and just drew on it in pencil. If I have time, my plan is to grab some laminating film and make it like a window in the box. Early finishers also wrapped up this drawing lesson:
I'll be certain to share their drawings soon!
The sayings the kids picked out was my favorite part. I thought it spoke so much about the kid creating the heart.
I had printed out a list of the hundreds of sayings that Necco has used every year on their hearts. I told the kids they could come up with their own saying...or use one of Necco's. All I asked was that I check what they planned to write first. I didn't have any issues with inappropriate sayings...but I didn't want to take my chances.
Love to hear from y'all if you gave this project a go! I'm off to put these on display in the library.
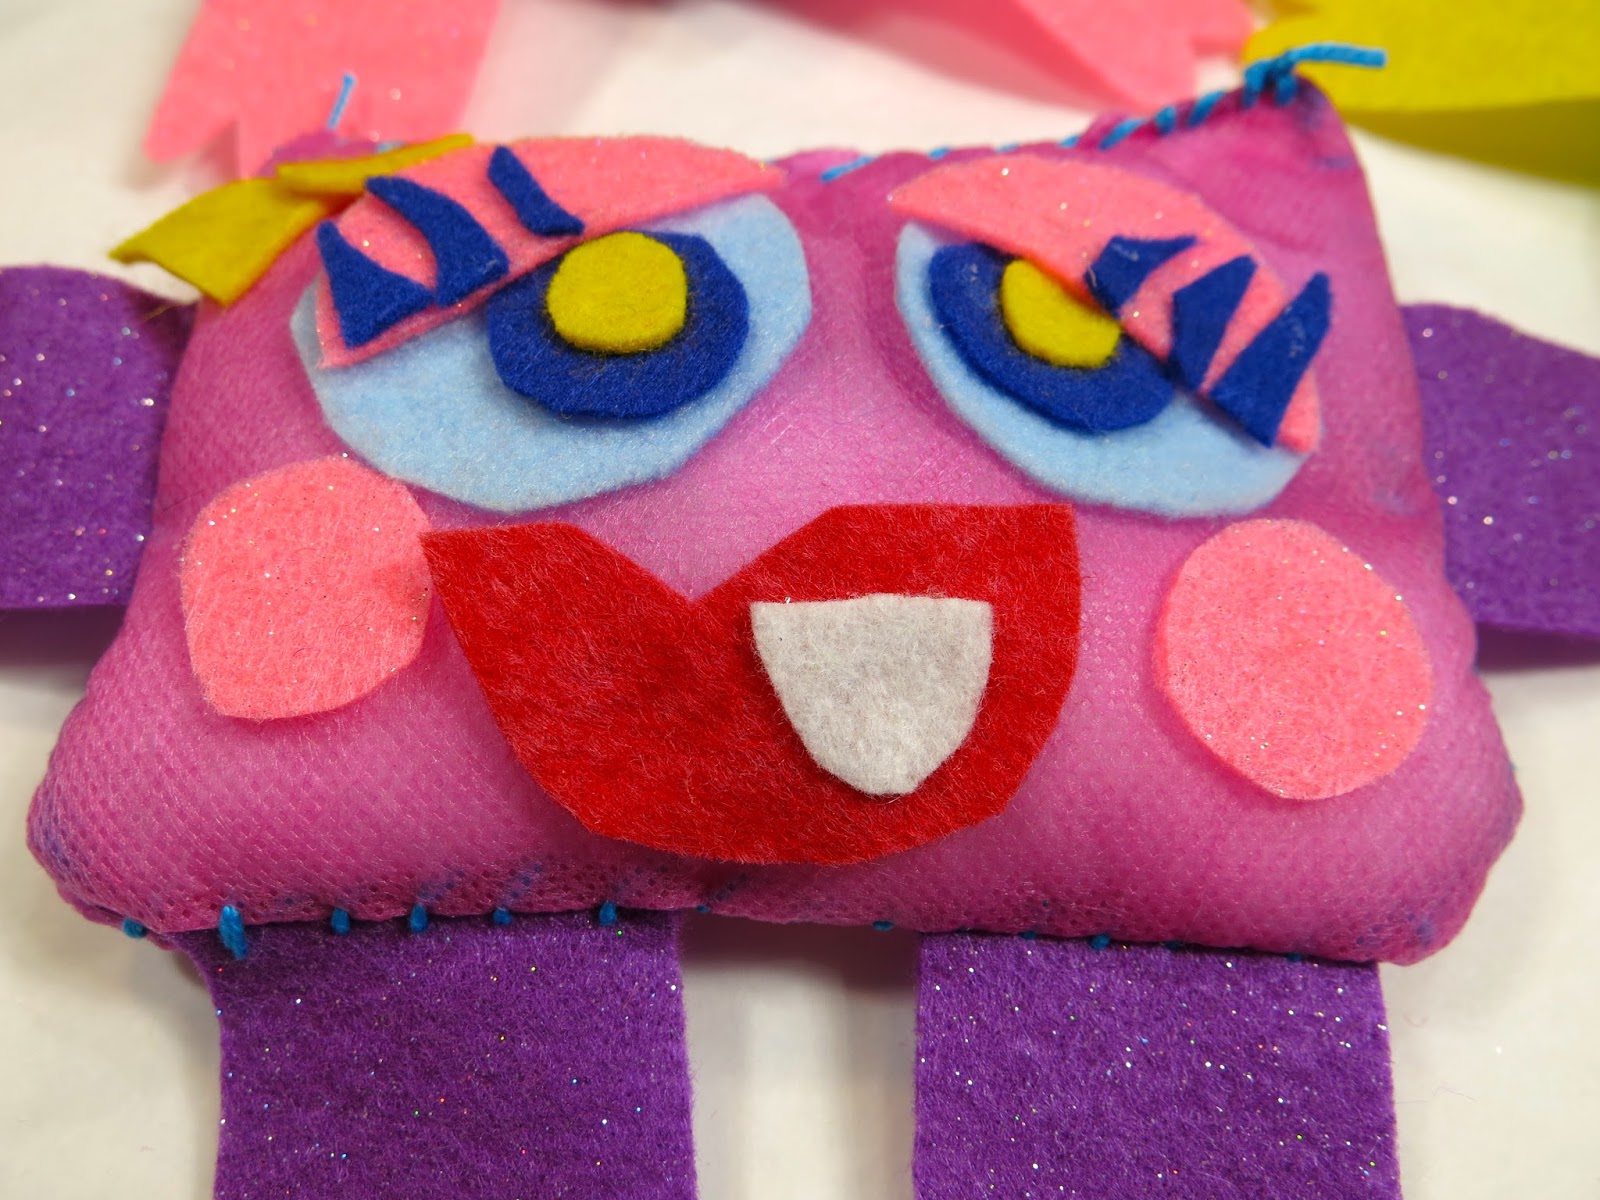
Going LIVE tonight, Wednesday at 8pm CST to talk about some art teacherin' issues! Hope you'll join me over here. See you real soon! As my fourth graders are wrapping up their Candy Heart Sculptures and drawing, I'm thinking ahead to a fun fibers unit for them. Last year, this group explored embroidery and did a really fabulous job. I know they will love expanding their knowledge and creating these fun stitched monsters!
I wanted a stitching project that would introduce them to the following: pattern cutting, pinning, sewing, stuffing and embellishing. I also wanted a fun contemporary artist tie-in and I found the artist behind Cotton Monster, Jennifer Strunge, to be perfect.
Aren't her monsters just the most amazing thing ever? I need one in my life, stat. Here's the video I created to introduce my kiddos to Jennifer and all things stitching! Feel free to use it in your art teacherin' world. I think it would be perfect for 3rd grade on up.
I anticipate this project will take my students 3 one-hour art classes. When I share my video, I show it to the kids in short bursts. I then allow them to go work and set my timer for the amount of time I expect it will take them. When the timer goes off, finished or not, all kids report to the floor for the next video viewing.
On Day 1, we'll learn about Jennifer Strunge, cut out arms, pin them in place and, hopefully, stitch one side. The following day, we should be able to wrap up the stitching, turn inside out and start working on the face. We will pulling out our Monsters of Creativity collages and looking at those for inspiration!
Day 3 (and, let's be honesty, probably Day 4) will include gluing the parts of the face down, stuffing and stitching closed.
I'm thinking of tasking my early finishers to think of themselves as toy creators and their monsters as their creation. As such, they'll need to think of their monster as a product. Who will it be sold to? How will it be packaged? What will be the price? Why should people buy it? I'll keep you posted on this adventure!
Have y'all done stitched monster projects with your students? Love to hear what you've done! And if you do this project, please be sure and let me know, I'd love to see your student's creations.
Hey, y'all! Today I saw a couple of fourth grade classes for their second day working on their Faux Stained Glass Winter Scene project. I was so impressed with their beautiful work that I thought I would share and let you take a peak at how these 12" X 18" beauties are turning out. In case you missed the demo video, here it is:
On our first day, we sketched out our ideas, enlarged our favorite onto our 12" X 18" piece of paper and drew the lines in either black glue or puffy paint. I decided to change the size of the artwork to better accommodate frames. I have had parents tell me that when we do odd shaped artwork, it is difficult for them to frame. I really love the idea of them framing their child's work so of course I'm going to make some changes to have that happen!
Today we watched the second half of the video and dove right into chalkin' it up. I stressed the following: no more than three colors per shape; colors had to be analogous; keep your fingers clean by washing and drying regularly.
About 1/3 of the kids finished today, some used glue today (because they were absent last time) and others are still in the middle of creating. Yay! That should be real fun to coordinate all those finishers/almost finishers/no where near finisheders. Such is art teacherin' life. I plan to provide some open ended projects for those wrapping things up as that will be our last class before break.
One of the half dozen freshly-glued designs from today. We dry these on our messy mats on the floor. I found that placing them on the tilted drying racks causes the glue to run.
The partially finished pieces really stole my heart. These kids were serious about taking their time and doing their best. I love this Hershey Kiss tree!
This one is really so stained-glass-esque.
This artist got a big warm hug from me. So stunning!
And this artist, ah! I was so concerned when I saw his glued design as I thought, that is gonna take him forever! I was worried that he wouldn't have the patience to fill it in the best he could but he really is rockin' it!
And this one says Paul Klee to me! Please feel free to give this project a go in your art room! I'd love to see the results if you do.
I don't know what y'all call that time between Thanksgiving and winter break but I have been known to call it a naughty name or two. It's that weird in-between time where we are all comin' down from our vacation high and are so exhausted that we need another one. And just knowing that winter break is on the horizon can sometimes just be more than I (and the kids!) can handle. This week, so far, back to art teacherin' town has been a good one. I'm happy to be back making big messes with little people. One project that seems to have the fourth grade really excited is this Faux Stained Glass Winter Scene.
I used black glue for the very first time in my teaching career last month and I (as well as the third graders) was all WHERE HAS THIS BEEN MY ENTIRE LIFE?! It is so much fun to create with! While they were working with it, I got the idea to introduce my fourth graders to the same media. With my Field Trip! series, I've been introducing the kids to contemporary creatives. Unfortunately, I don't personally know any local stained glass artists to film (any leads would be much appreciated!) so I created this introduction to the art of stained glass with a little iMovie wizardry. The fourth grade watched the first half of the video today and got a good start on their faux stained glass.
The kids were SUPER bummed when I said that we weren't going to work with cut glass (really guys?!) but were excited when I mentioned black glue. I had them move to their seats and silent sketch several ideas for 5-7 minutes.
I really emphasized not creating a Christmas tree knowing that this project just might not be completed until after the holidays. However, I didn't want to limit the kids so I made it optional. Personally, I love that skull tree on the left!
After our sketch time was up, we regrouped on the floor and watched the part of the video where I talk about drawing on large paper and using the puffy paint or black glue.
Puffy paint leaves a better, crisper line but it does take a little extra work to squeeze that bottle. The black glue (made with one part black tempra and two parts Elmer's Glue All) comes out faster but leaves behind a wider, flatter line. I shared with the kids the pros and cons and let them decide which they wanted to use.
All but a handful of kids got to the black glue on the first day. I did change the size of the paper from what was in the video as I thought a 12" X 18" would be easier to manage.
One thing I had to really emphasize was keeping the drawing large. Showing that clip of the stained glass artist really did help them conceptualize the idea of large and enclosed shapes.
Of course, it wouldn't be black glue painting if we didn't have the occasional smearing. We learned to just let it go. The chalk can hide any imperfections.
Gotta love a tree of Hershey Kisses! I'll keep you posted on the progress of this project. I see so many variations: landscapes, abstract designs, etc. I'd love to know if you have used this method. If you do, please drop me a line and share.