So by now y'all know that my love for Halloween and Celluclay run strong. I discovered my love for Celluclay this summer when working on that clay book I wrote (stay tuned, we're getting closer each week to being finished with it and I'm so excited!). About a month ago, I used Celluclay and old trick or treat buckets to create these retro-inspired Halloween decorations. Then I went all Zombie-fied and made these Walking Dead Head Planters. This time around, I decided to create a Book of Spells that serves as my treat holder for all the trick or treaters!
And I learned how to make a gif. My apologies in advance.
When the hubs and I were in Orlando last month, we hit The Wizarding World of Harry Potter which is INSANE. Everyone should go there, it should be required by law. It is so incredibly inspiring and wonderful that you just gotta stand back and soak it all in. With a Butter Beer, of course. Now, I've not read any of the Potter books (much to my husband's dismay, he's a HUGE fan) but it's on my To Do. In the meantime, I'm just going to continue to be inspired by the park, the movies and create Halloweenie-themed stuff like this.
So I went to the thrift store on Monday with the intention of scooping up a large hardback book. I already had reservations about the idea because I thought the water in the Celluclay would cause the book cover to warp. But I was all set to cross that bridge when I got there (cuz planning head really isn't my thang).
But what was waiting for me at the thrift turned out to be much better: this old jewelry box! Best part is that I can use it tomorrow to serve up some treats to the neighborhood kids. The jewelry box does have that special old-lady-perfume-smell but I'm pretty sure no kid is gonna turn their nose up at a pack of skittles that smells like The Golden Girls. And if they do, they don't deserve to taste the rainbow anyway.
So just what is Celluclay and how do you work with it? I made a video when creating the pumpkins that walks you thru the simple steps. All you need is the clay (which can be found on Amazon and at your local craft joint) and water.
I did try to air out the old-lady-perfume smell but it really doesn't bother me. Since I wear a lotta vintage, I'm kinda used to smelling like a lil ole lady. Shoot, man. I kinda am one!
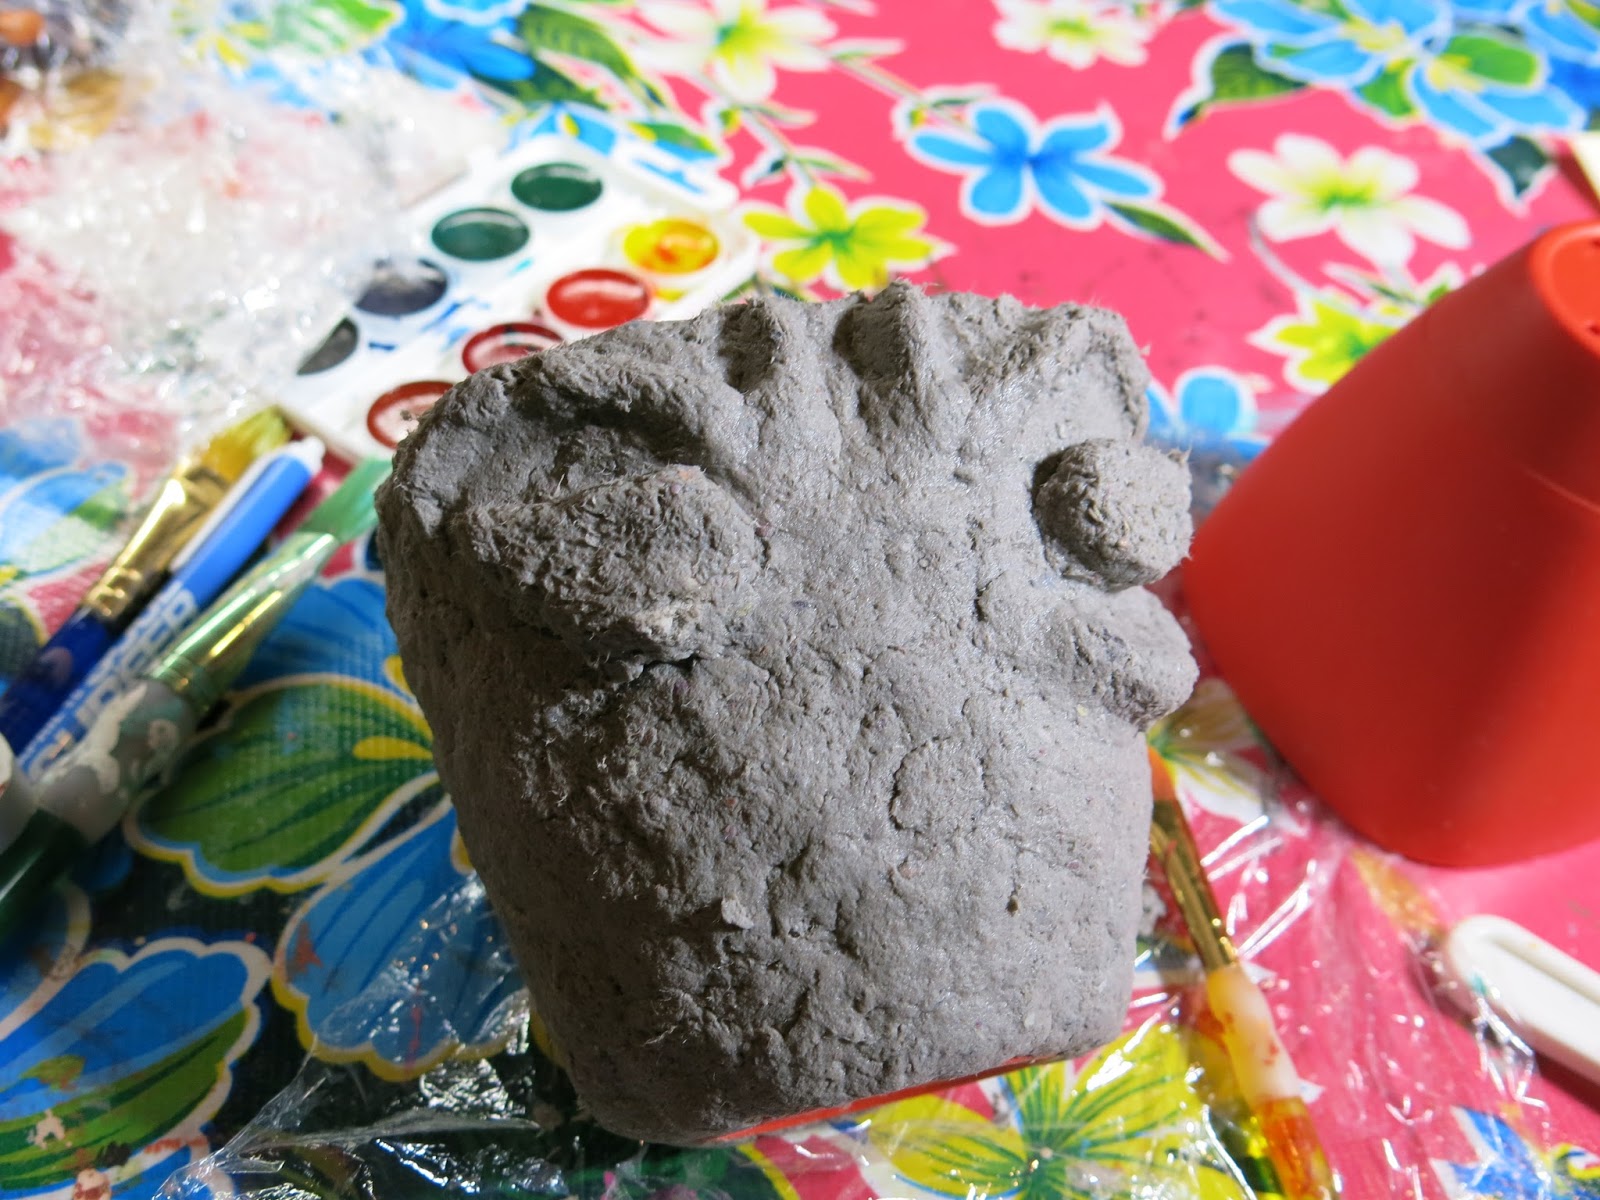
Now usually when I go about creating, I start with some sort of plan in mind. This time, I decided to live life dangerously and just start slapping the Cellulclay onto the surface.
Disney's the Haunted Mansion and it's silly/spooky ghouls were what inspired the faces on both the spell book and my potion bottle below.
I worked on this guy a little each night. It took some time to cover the entire book, the sides and the binding. I was worried it wouldn't have enough time to dry so I placed it in front of a fan during the day. Also...the great thing about Celluclay is that you can continue to work on it and add to it even if the other parts are dry. This is totally different than kiln fire clay. I dig that about Celluclay. Also, I made a huge batch of the clay for this project. When I wasn't using it, I just wrapped it in plastic wrap and stored it in the fridge.
Once dry, it got a coat of black acrylic...and from there, I forgot to snap any more photos of the process. Sorry, my bad. However, I used the same dry brush technique that I've used in the other Celluclay projects I've shared.
I had a lotta fun with the details...like this little knob that was on the side of the box that I transformed into a shrunken head.
Please pardon the cat hair, we save it for the magic spells.
So, like I said, I started this on Monday. On Tuesday, I went to a different thrift store (guess who has a shopping problem? GUESS.) with the idea in mind that my book needed some potion bottles. I had seen folks using cheesecloth and liquid starch for projects and I was excited to give that a go for some bottles. However, when I got home, I realized that I had forgotten the cheesecloth at the grocery (anyone else make grocery lists and then LEAVE THEM IN THE CAR?! My life). But I was so excited to get started that I used my left over Celluclay to create a matching bottle for my book.
Boom! Take that grocery-list-lookin-all-smug-sitting-on-my-dashboard.
I started with this funkily shaped bottle (yes, funkily is a word).
After hastily sketching my idea on the bottle, I set to work. This took all of 15 minutes to create. I put it overnight in front of the fan and started to paint it this morning.
This time, with photographic evidence! Try to ignore the pj pants who are making a feature in this photo. I stay in pj's during the weekend. True story.
Painted black. Y'all, I gotta tell you, I am loving this crafting outside thing. The weather is perfect and great for drying.
Dry brushed it with some gold and done! This was one of those crafts that looks complicated (says me) but went off without a hitch. I really would love to do something like this with my students sometime. Sans skull and crossbones, of course.
I love how they look together. Just a coupla goofy guys.
And a weird chick. But you knew that already.
Mitch had the idea of putting some pillow stuffing in the bottle for smoke. He's so clever.
Of course I had to see if it was really poisoned.
It wasn't...but, seriously, what used to be in that bottle?! Yuck!
I actually have TWO more Halloween crafts to share with y'all after this one...so be sure and pop back by soon. I just might have to do a double header tomorrow.
These here Zombie Head Planters are the ugliest things I've ever made and I really couldn't be happier. Weird? Yes. Okay with that? Totes.
I mean, you gotta have respect for something that finds brains appetizing, y'all.
So I got the idea to create these Zombie Head Planters last week after I wrapped up my last Celluclay creation. I STILL had half a bag left of the stuff (a little goes a long way...and even with these guys and the pumpkins, I still have some left over) so I actually have another project I'd love to do...but more on that later.
Let's talk about the brainz-eaters at hand, shall we?
Over the summer, I picked up these little plastic planters from Target with the grand idea that I'd plant herbs in them or something. That didn't happen and so six of these dudes were sitting around collecting dust. I had been using them to prop up my pumpkin heads as I worked on them...which gave me the idea to create these.
Need a review on how simple it is to work with Celluclay? Here you go!
Originally, I was just going to make the heads but I really liked the idea of the zombies having a body as well. So I used the upturned pottery for that.
Again, I didn't sand the plastic or prep it in any way. The clay did take longer to dry this time as the weather is now cooler. So I put them in front of a fan overnight and they were dry the next day. They've yet to crack or flake off which is great. They are rock solid once painted and Modpodged.
Painting was easy. I just picked a dark green color to paint everything, put them in front of the fan and started to dry brush on lighter colors. With a smaller brush, I added details. But, really, the painting is the easiest part. The surface of the Celluclay is perfect for zombies...who knew?!
My original idea was to have herbs in the planters but let's get real: I have a black thumb. So I shopped the heavily marked down fall floral isle of my local craft store and picked up what I thought would look good as hair and brain matter. I'm sure that's what everyone looks for in the floral isle, right?
True fact: I am no floral designer nor do I pretend to be. I seriously just used those floral foam thingies, hot glued some moss on that and stuck in some flowers.
Side note: hot glue and styrofoam don't play well together. The hot glue melted the foam and, um, that was fun. I was watching Project Runway so I channeled my inner Tim Gunn and I made it work (which for me always means: ADD MORE HOT GLUE!).
And I'm kinda sorta thrilled with how they turned out! With faces only a mother could love.
It's funny, whenever I'm tasked with creating something at a PD or otherwise, I ALWAYS make this lady. Sassy retro mama with a gnarly expression and usually a cigarette dangling from her lips. I think she's my spirit animal.
This is my tribute to Gene Wilder's character in Young Frankenstein...note the hair. Of course, I had to zombie-ize him. I love how the moss looks like brains.
P.S. these will NOT be on display in our bedroom. Their eyes seriously do follow you everywhere.
Don't tell the others but this one is my favorite. It reminds me of Beetlejuice...which is super duper in my book.
Now off to find just the perfect place in my house for these lovelies. Love to hear from you if you've worked with Celluclay and what you've created. You can comment below or shoot me an email. In the meantime, steer clear of the brain-eaters, y'all!
Every year, when fall approaches and the light begins to change, I get this urge to create. Often times that results in a Halloween-inspired dress, needle felted sweater or painting (stay tuned for a big ole blog post with all my fave fall crafts!). This year, I was inspired to create these wannabe vintage Halloween trick or treat buckets!
I got the idea from a shop I happened by one morning. They had these sweet little papier mache treat buckets on display in their window that were more than likely made in a land far, far away. I immediately wanted to duck into the shop and scoop them all up but the nearly $40 price tag kept me away. Then I got the idea: I'd just hit up the thrift store on the way home, pick up some plastic trick or treat containers and make my own.
Here's how, y'all!
I found three of these at my local thrift store in various sizes. I happened to have a couple bags of Celluclay that had been in my school storage closet for almost as long as I've been there.
I had one of the big bags...and as you can see in the video I'v hardly put a dent in the thing. A little goes a long way. What I love about the clay as opposed to papier mache is that it goes on so much faster and doesn't have the texture of elephant snot. So there's that.
Here's the making of the cat. I knew I wanted ears so for him, I simply hot glued some tag board ears to the top.
I had a wee big of a battle with the handle but I made it work.
Surprisingly, the tag board was able to withstand the weight of the clay.
Covering the pumpkins was the first step. It seemed to take forever and was not my fave. I was ready to dive into the face-making part!
So much fun. I drew a lot of inspiration from a "vintage Halloween" google search. That lead me to this incredible artist Johanna Parker who I'm currently a huge fan of!
It was nearly 90 degrees the day I set these guys outside which worked out perfectly as they were dry in no time. This winter, when I experimented with the clay, it took up to a week to dry and did mold a bit on the bottom because I forgot to rotate the clay project. So, not only do I suffer from Cellu-Lung but also Cellu-Mold neither of which my insurance covers. Of course.
The surface was rough but not difficult to paint. I do think kids would struggle as it is def not the easiest surface if you are trying to paint neatly. I rather dug the texture though as it meant I could play around with layers of paint and depth.
I think painting the white pumpkin was my favorite. I started by painting it completely orange then layering the white on top with a dry brush.
After painting the details of the face, I went back and added the line on the pumpkin in orange and a dry brush of light orange and yellow. Once they were dry, I went over each with satin ModPodge to add just a hint of shine. I really can't decide if these pumpkins are ugly or cute. I'm going with ugly cute. Regardless, they will not be on display in our bedroom as I can't have that creeper staring at my when I'm trying to sleep.
Ugh. I kinda wanna make more! My fall break is quickly approaching, I just might have to!
If you follow me here, I know you've seen me sharing the process like crazy. I'd love to know if you give this a go!
Not gonna lie, this one's my fave.
But this one is a close second!
Next up on the fall crafterin' agenda: a Black Cat dress and a EYEBALL sweater, eek! I can't wait. Til then, y'all!